Pumpkin Design for Halloween: A Practical Guide to Customization and Usage
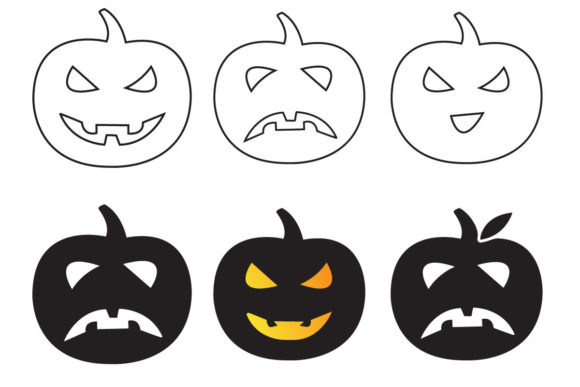
Hi there, I am Rojy, a brand identity designer. If you are looking for a Pumpkin Design for Halloween, you have landed in the right place. This specific asset is more than just a seasonal graphic; it is a versatile tool designed to adapt to your creative vision. Whether you are launching a new product line or creating a spooky background for a digital campaign, the flexibility of this design is its greatest strength. The colors are fully editable, meaning you are not stuck with a static image. You can change the hues to match your brand palette or shift them to create a horror-type background that truly stands out.
However, while the potential is high, many creators make critical errors when integrating these assets into their projects. As someone who has spent years refining visual identities, I want to help you avoid common pitfalls that can ruin the quality of your final output. Let's explore what makes this design effective and how to use it correctly.
Understanding the Core Value of Editable Pumpkin Assets
A standard Pumpkin Design for Halloween often comes as a flat JPEG or PNG where every element is locked. When you buy or download a generic version, you might find yourself unable to adjust the stem color, the texture of the skin, or the lighting effects. This limitation can be frustrating, especially if your project requires a specific color scheme. In contrast, the design I am sharing offers full control. The source file is provided in Adobe Illustrator (AI) format with RGB color settings, ensuring that every vector path is accessible.
This level of editability allows you to transform a simple pumpkin illustration into a complex piece of art. For instance, if you are a small business owner planning a t-shirt collection, you might need the pumpkin to appear in neon green for a "glow-in-the-dark" effect or deep purple for a gothic theme. With an editable AI file, you can achieve this instantly without needing to redraw the entire character from scratch. This efficiency saves time and ensures consistency across your marketing materials.
Common Mistakes in File Selection and Quality
One of the most frequent mistakes I see is prioritizing file size over resolution and format. Many users download a free version of a pumpkin design only to realize later that it is too low-resolution for print. If you intend to use this design on large-format merchandise like banners or high-quality t-shirts, a low DPI (dots per inch) file will result in pixelation. This ruins the professional look of your product and can lead to customer dissatisfaction.
The design I offer is set at 300 DPI, which is the industry standard for print production. This ensures that whether you are printing on fabric, paper, or vinyl, the edges remain crisp and the colors stay vibrant. Always check the DPI before downloading. If a file claims to be printable but does not specify the resolution, assume it is meant for web use only. Using a web-optimized image for a physical product is a recipe for poor results.
Navigating Color Modes: RGB vs. CMYK
Another area where beginners often stumble is the color mode. The file I provide is in RGB color space. This is perfect for digital applications such as social media posts, website headers, and email newsletters. However, if you plan to send this design to a commercial printer for mass production, you must understand that printers typically require CMYK (Cyan, Magenta, Yellow, Black) files. While the AI format allows you to convert colors easily, failing to manage this transition can lead to duller colors in the final print.
To avoid this, always verify your intended medium. If you are designing a t-shirt, you might stick with RGB for the screen design but convert to CMYK for the actual garment printing process. Alternatively, if you are using a print-on-demand service, they often handle the conversion automatically, but it is safer to test a small sample first. Never assume that a bright neon color on your screen will print exactly the same way without adjustment.
Applying the Design to T-Shirts and Horror Backgrounds
The versatility of this Pumpkin Design for Halloween extends beyond just clothing. It is equally powerful for creating horror-type backgrounds. Imagine a dark, textured backdrop with a stylized pumpkin floating in the center. Because the elements are separate vectors, you can layer them, add shadows, and blend them with other textures to create depth. This technique is essential for creating immersive experiences in video games, movie posters, or event flyers.
- For T-Shirt Designs: Use the editable colors to ensure the pumpkin contrasts well with the shirt color. A light orange pumpkin on a white shirt might lack impact; try shifting to a darker shade or adding a glowing outline.
- For Horror Backgrounds: Manipulate the opacity and blending modes. Overlaying the pumpkin with grain textures or blood splatter effects can elevate the mood significantly.
Many creators make the mistake of placing the design directly onto the canvas without considering the negative space. Good design relies on balance. Ensure there is enough room around the pumpkin so the eye isn't overwhelmed. If you are adding text, make sure it does not compete with the main subject. The pumpkin should be the star, not just one element among many cluttered details.
Evaluating Your Choice Before You Commit
Before you decide to use any asset, take a moment to evaluate its suitability. Ask yourself: Can I actually modify this? Does the resolution meet my needs? Is the color mode appropriate for my workflow? These questions are crucial for avoiding wasted effort. If you purchase a template that requires a specific software version you do not have, you may find yourself stuck. The AI format used here is widely compatible with modern versions of Adobe Illustrator, making it accessible for most professionals.
Furthermore, consider the licensing terms. Even if a file looks great, using it without understanding the rights can lead to legal issues, especially for commercial projects. Always read the fine print regarding how many times you can use the design and whether you can resell modified versions. Transparency is key to maintaining trust with your audience and protecting your business.
Maximizing Efficiency with Editable Files
Using an editable file is about more than just changing colors; it is about streamlining your workflow. Instead of hiring a designer to tweak a stock image, you can do it yourself in minutes. This autonomy empowers freelancers and small business owners to iterate quickly. You can test different color combinations for A/B testing on social media without waiting for external approval. This agility can give you a competitive edge in fast-moving markets.
Remember, the goal is to create something that resonates with your audience. A generic pumpkin design might get attention, but a customized one that fits your brand identity will build loyalty. Take the time to refine the details. Adjust the curve of the stem, tweak the shadow intensity, or experiment with gradients. These small touches make a huge difference in the perceived quality of your work.
I hope you like this pumpkin design for Halloween. It is crafted with care to serve your creative needs. Thank you for taking the time to learn about how to use it effectively. By avoiding common mistakes and leveraging the full power of the editable features, you can produce stunning visuals that stand out in a crowded marketplace. Thanks in advance for giving it a try, and happy designing!